How to Paint an Exterior Door as in, Shut the Front Door!
Probably the least expensive yet near impactful means you tin update the wait of your exterior front end entry is to paint the front door.
 View in gallery
 Such a huge chunk of colour, front-and-middle, is certainly one of the most visual aspects of your forepart entry infinite. That's why picking the perfect front end door color and painting information technology correctly is vital if you want to give off the best possible showtime impression. It's a unproblematic and straightforward process. (Just be certain that you're prepared to get out your door open the entire 24-hour interval.)
 View in gallery
 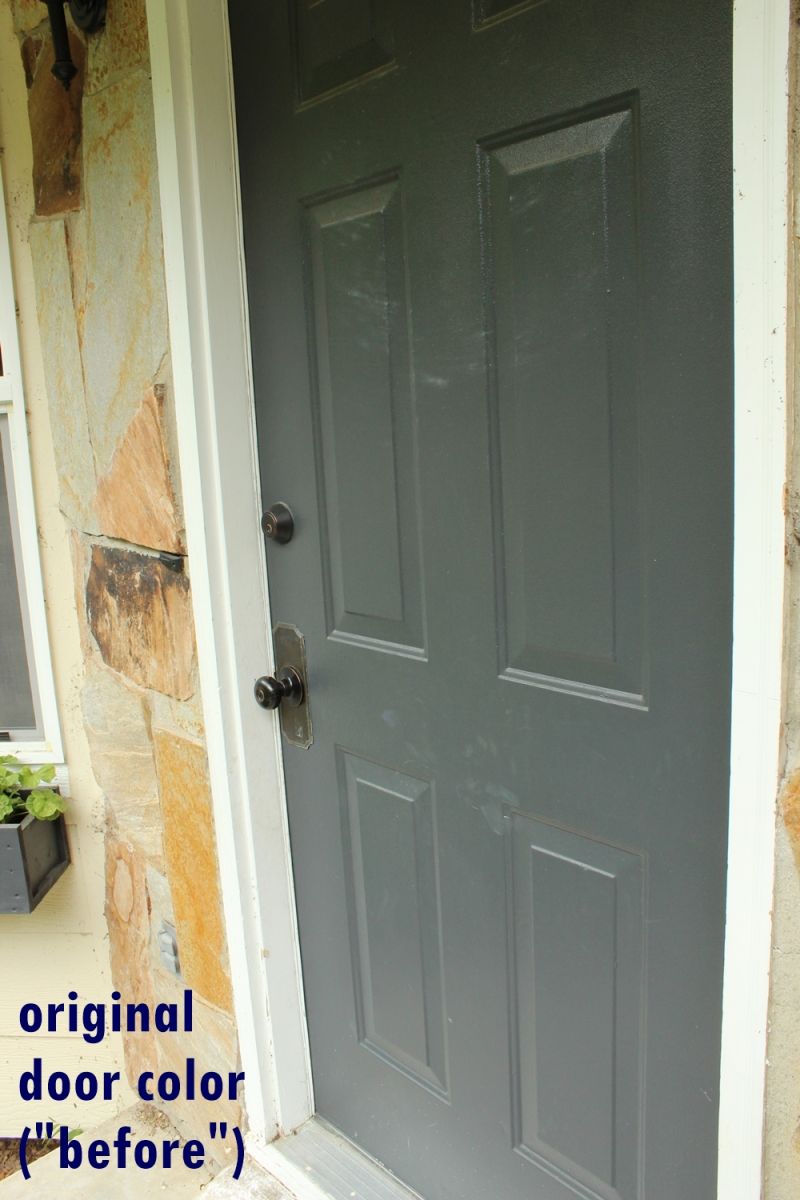 View in gallery
 How to paint the front door: Step by Step Guide
Step 1: Choosing the colors
 View in gallery
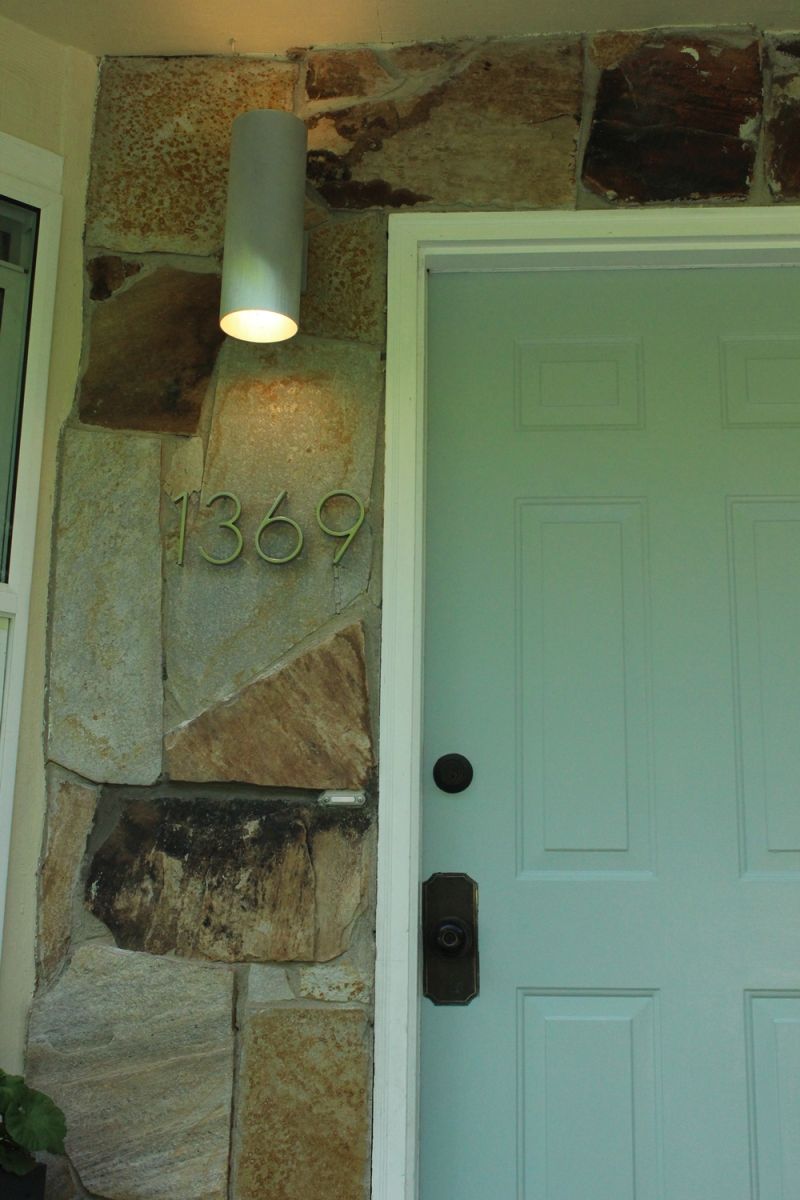
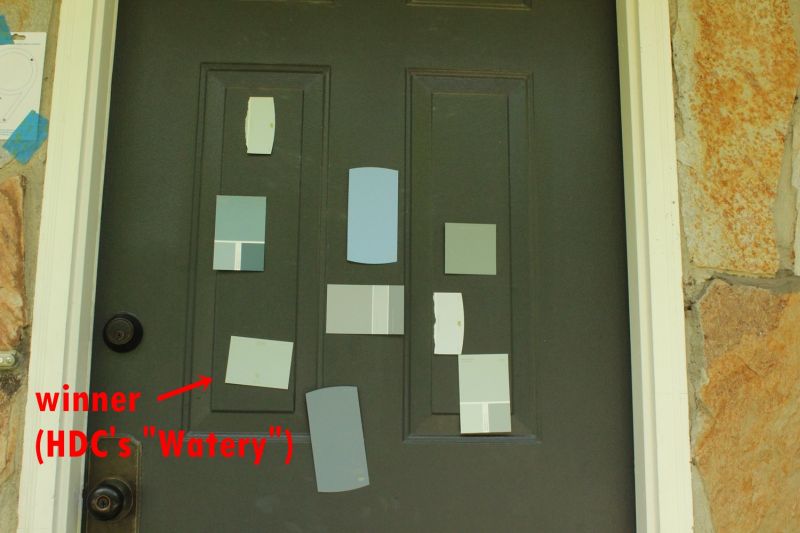
 Look at the colour(s) on your firm. You'll want to choose something that goes with the residuum of the house, get-go and foremost. This example shows a house with a brown-tan-orangey rock face up.
These are non amid the homeowner'southward favorite hues, but they had to be taken into consideration before selecting a door color. Considering orange and blue are complementary colors, and the previous door was quite night, it was determined that a lighter/softer shade of warm blue would exist nice.
Many pigment fries were collected that hovered effectually this idea, so they were taped to the door and analyzed. (The color selected is chosen "Watery" by Home Decorators Drove, a lovely bluey-greeny-grey.)
 View in gallery
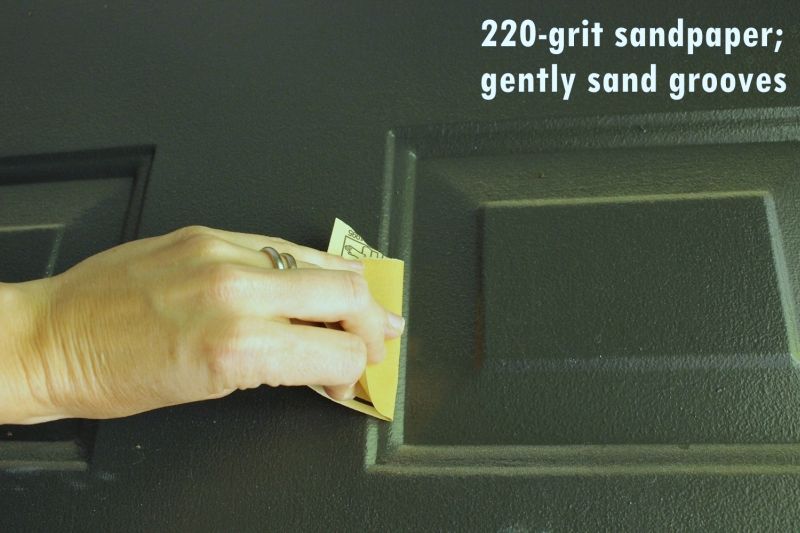
 Pace 2: Sandpaper process
Have a bit of 220-grit sandpaper and first sanding your door face. Start by gently sanding the grooves, if your door has whatsoever. Tip: You desire to sand away major imperfections, only you lot don't need to spend forever sanding.
 View in gallery
 Then motion on to the flat surfaces. Looks similar the color before ebony was a shade of cobalt blue.
 View in gallery
 When performing a quick, lite sanding, it'due south helpful to keep in mind that you're non necessarily out to achieve a uniform colour in the sanding. Some sections are bound to need a bit more sanding; others, significantly less. If you find yourself looking at an surface area that seems to need more sanding, get by experience instead of by look – terminate sanding every few seconds and run your fingers over the area. If it feels smoothen, no affair what it looks similar, you can move on.
 View in gallery
 Stride 3: Wipe cleaning
Wipe downward the door with a cleaning cloth. Or a baby wipe.
 View in gallery
 Step four: Taping proces
When your wipe-downwards has stale completely, it'south fourth dimension to tape off everything y'all don't want painted. Note: It'southward a good idea to simply remove all hardware before painting. That way, you can get an even sanding done, and you don't run the run a risk of pigment dripping on your doorknob or keyhole.
 View in gallery
 This example avoids removing the door'south knob and lock because those pieces had to be rather trickily installed past a locksmith due to some weird issues on our old door, so in place they will remain, covered securely with tape.
 View in gallery
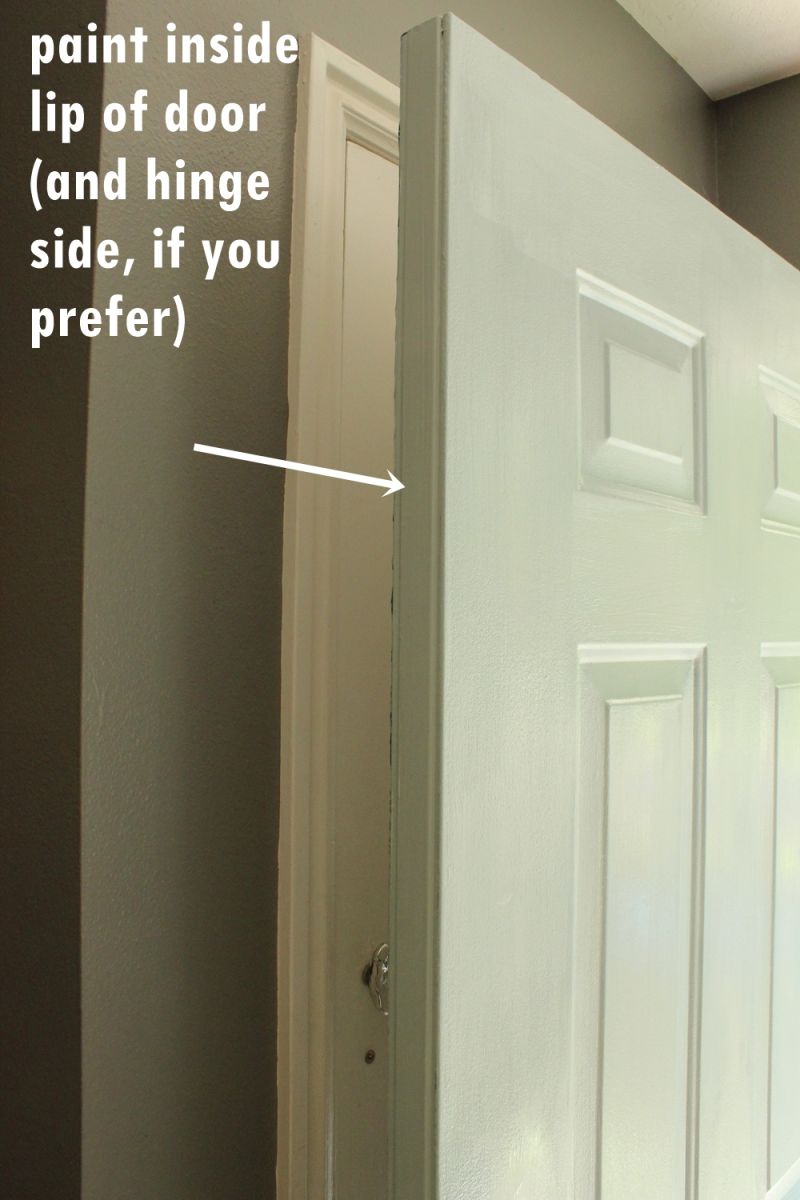
 Also, because you will be painting the inside lip of your door (the face up that touches the doorjamb), information technology's a good idea to run a piece of painter'south tape down the edge.
 View in gallery
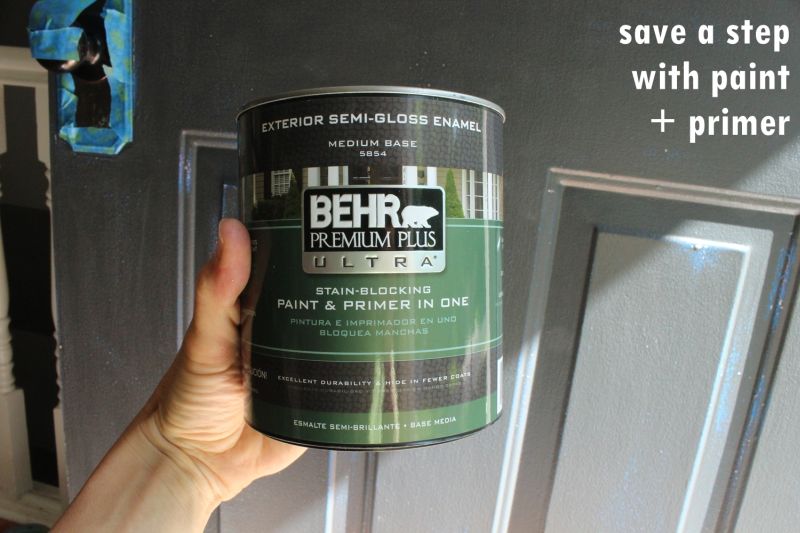
 Footstep 5: Choosing the primer
Grab your exterior paint. I recommend (along with many painting pros) a combination paint + primer to save yourself a step while achieving a uniform paint coat. Otherwise, use two coats of primer and so exterior paint on top of that.
 View in gallery
 Admire your called colour. Oh, yes. I call back you're gonna similar information technology hither, Watery.
 View in gallery
 In that location's a method to painting a door that makes it await great at the end, and I'm going to share it with you lot now. Begin by painting the angled perimeter of a top panel (i of the six rectangular panels on this door) with a castor. This first coat should be a light one; don't worry if some of the sometime pigment color shows through in parts. You'll become it covered presently enough with the 2d/third coats.
 View in gallery
 Step 6: Add the color
Pigment the entire panel, and then move on to the neighboring panel, all the same with a castor. Stop there for a minute. Make sure, equally y'all're painting these, that the edges of any new paint brush strokes are smoothed out immediately. If you go out them, even for 30 seconds, they tin can commencement to gear up a flake, which makes for a very un-smooth end result. Be constantly watching for drips and drops and paint running, and swipe them away immediately.
 View in gallery
 Next, for the first coat, y'all can take a high density foam roller and paint the apartment parts around the two panels you've just detailed. Once more, watch the edges of your new paint swipes; if there is fifty-fifty a small bit of excess paint that is left to sit down in that location, it will offset to set up and make an ugly bump or line when you pigment over information technology after.
 View in gallery
 Don't forget nigh the inside of the panels, if applicable. Continue this lodge – brush grooves, check paint edges, roll perimeter, cheque for paint drips, roll interior, watch out for weird paint globs – for every panel on your door.
 View in gallery
 Don't forget about the doorjamb lip(s) – paint the knob one for sure, and the swivel one if you want.
 View in gallery
 Let everything dry (typically for near four hours, if you lot did equally you were supposed to and kept the first coat of paint a light one).
 View in gallery
 Step 7: Sand the new fresh paint
Grab your 220-grit sandpaper, and do a very light sanding all across the door. You're non trying to sand through this pigment coat, you lot simply are sanding abroad any slight pigment bumps if they came upwards because y'all forgot once or twice to shine out the edges of your new paint swipes. Don't worry, we've all been there. Just sand 'em downwardly.
 View in gallery
 Stride 8: The second coat of paint
For the second coat (and third, if you want…this tutorial did 3 coats), continue in the same method of painting the angles effectually each panel. Pigment equally though you're following a wood grain, fifty-fifty if in that location isn't one on your door, or if it'due south buried under 28 other coats of paint.
The only exception to this is the horizontal lines created by the top and bottom angled edges of each console; pigment those sideways. (Or, really, however you prefer.) Because I like the quaint look and feel of a brush-painted door, I used but the brush for the second and 3rd coats; no cream roller for me here. That'southward a preference call, though. Information technology'south certainly faster with the foam roller.
 View in gallery
 Step 9: Removing the protective tape
Carefully remove whatever tape subsequently your final coat, whether that'due south the 2d or third, while information technology'due south nevertheless wet.
 View in gallery
 Allow it dry.
 View in gallery
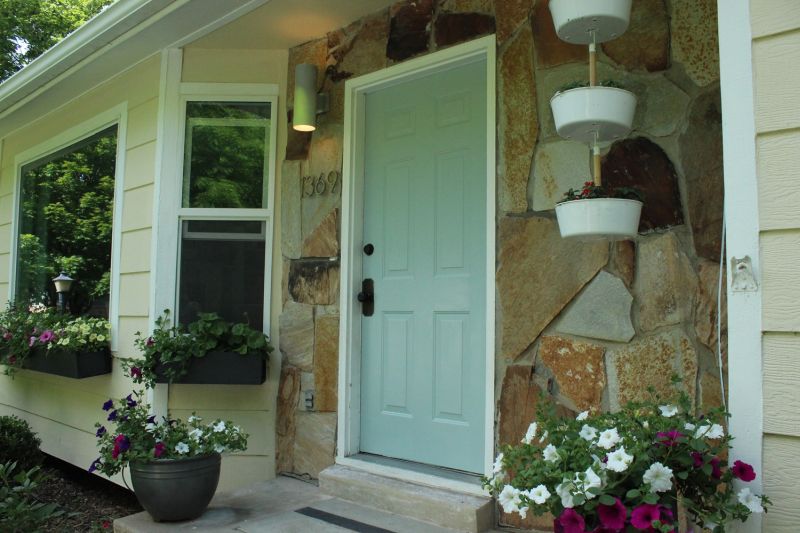
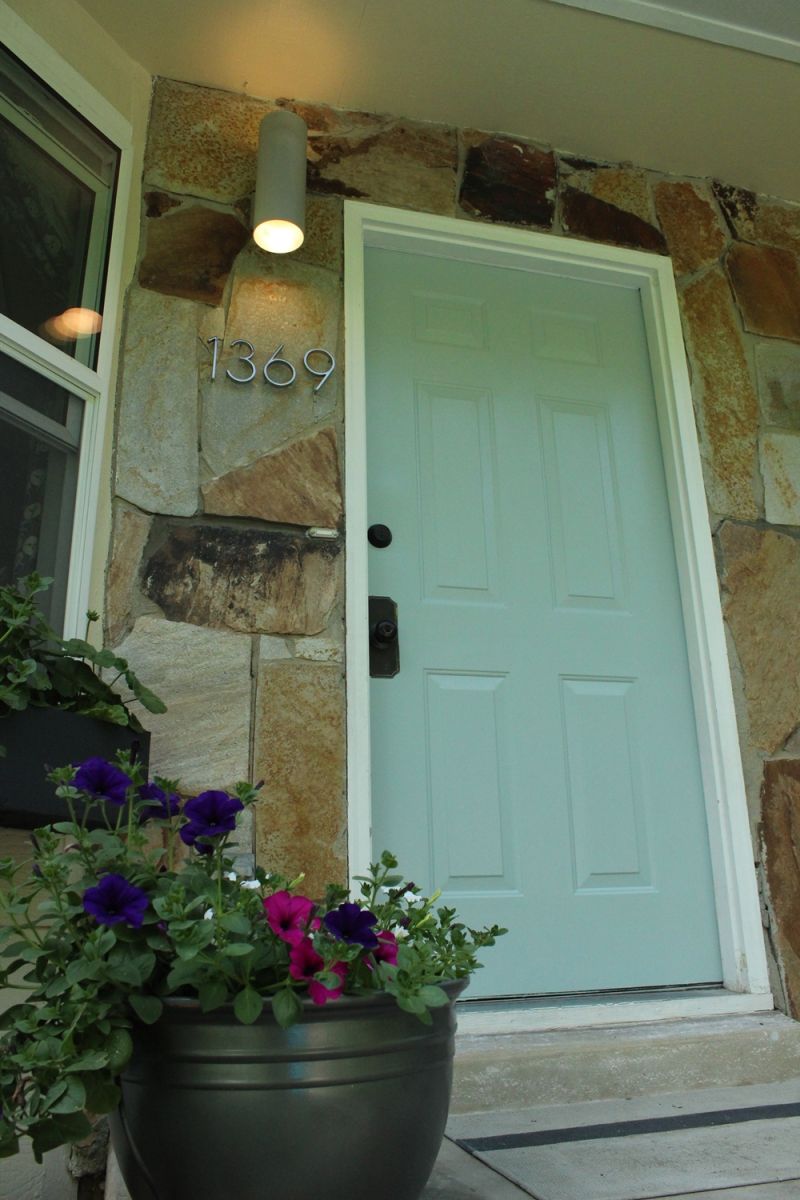
 Stand back, and close your door then you lot tin can see it with the residue of the house. Are you pleased?
 View in gallery
 Was the color option a proficient 1 for your space?
 View in gallery
 The color always looks a fleck unlike when actually painted on. Nosotros honey this one, though, because it adds a absurd, contemporary chemical element to the surrounding (dated) rock face.
 View in gallery
Congratulations!
Y'all just finished the single most effective thing you tin can do to pack a powerful punch with your front end door/exterior entry. We hope you love it.
Source: https://www.homedit.com/paint-an-exterior-door/
0 Response to "How to Paint an Exterior Door as in, Shut the Front Door!"
Post a Comment